

What Happens During a Full Roof Replacement?
What happens during a full roof replacement? If you have never been through the process before, it can feel daunting. Understanding each stage helps you plan ahead, ask the right questions, and feel confident about what to expect. This is a step-by-step guide based on how we carry out re-roofs across Cheltenham and Gloucestershire.
Every project is different, but the core stages are the same whether you live in a Victorian terrace in Montpellier or a detached house in Bishop’s Cleeve. Knowing what happens during a full roof replacement takes the uncertainty out of a major home improvement.
Stage One: The Survey
Everything starts with a detailed assessment of your existing roof. We use 4K Ultra HD drone technology to capture footage of every tile, ridge, valley, and flashing from above. The drone gives us a complete picture without anyone needing to climb onto the roof at this stage.
You see the footage on screen, and we walk you through exactly what we have found. We explain which areas are damaged, what condition the roof covering is in, and whether there are any signs of structural issues. Based on the survey, we provide a detailed written quote that covers every aspect of the work.
What the Quote Includes
Our quotes list every item: scaffolding, stripping the old roof, any expected timber work, the new membrane and battens, the chosen tile or slate, all lead work, ridge and hip tiles, and waste disposal. The price we quote is the price you pay. There are no hidden extras.
Stage Two: Scaffolding
On the first day, scaffolding goes up around the property. This gives our team safe access to every part of the roof and protects the building during the work. The time it takes depends on the size and shape of your home. A straightforward semi-detached house takes a few hours. A larger or more complex property may take a full day.
We protect your garden, driveway, and paths with sheeting before the scaffolding goes up. If you have plants close to the house, we will move or cover them. The scaffolding stays in place until the job is fully completed and inspected.
Stage Three: Stripping the Old Roof
With the scaffolding in place, we begin removing the old roof covering. Tiles or slates come off course by course and are lowered to the ground safely. We do not throw materials off the roof. Everything comes down in a controlled way to protect your property and garden.
Old battens are stripped next, followed by any existing roofing felt or underlay. By the end of this stage, the bare timber structure is fully exposed. All old materials are cleared from the site and disposed of responsibly.
Why This Stage Matters
Stripping the old roof is not just about clearing the way for the new one. It gives us full visibility of the timber structure underneath. Problems that are invisible from outside, such as rotten rafters, woodworm damage, or weakened purlins, only become apparent once the old covering is off. Catching these issues now is essential for a long-lasting result.
Stage Four: Timber Inspection and Repairs
This is one of the most important stages. We check every rafter, purlin, ridge board, and batten for rot, insect damage, splits, and structural weakness. On older properties across Cheltenham and the Cotswolds, it is common to find timber that needs attention.
Any damaged timber is cut out and replaced with new pressure-treated wood. If rafters have sagged or moved, we reinforce them. This structural work is critical. A brand new roof covering laid on top of compromised timbers will fail prematurely. We never skip this step, even when the timber looks acceptable from below.
Stage Five: Membrane and Battens
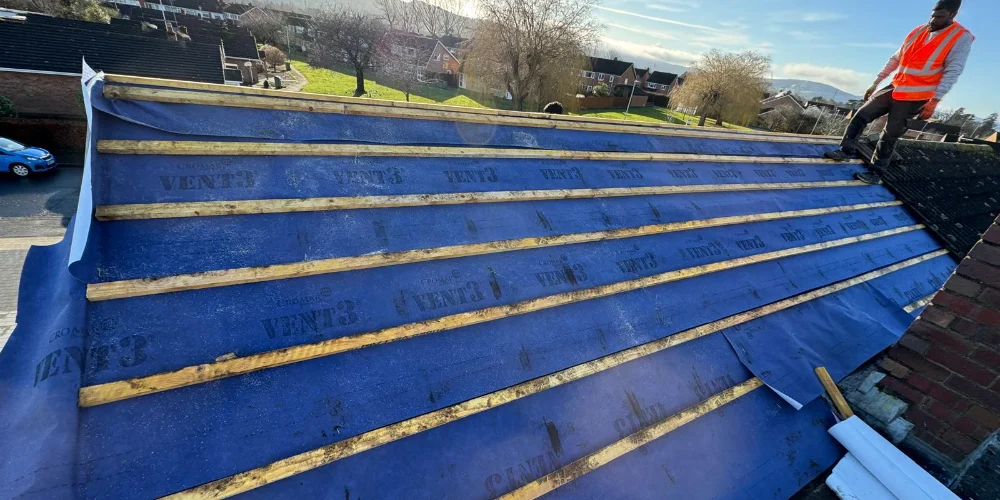
Once the structure is confirmed as sound, we lay a breathable roofing membrane across the entire roof deck. This membrane serves two purposes. It acts as a secondary barrier against wind-driven rain, and it allows moisture vapour to escape from the roof space. This reduces condensation and protects the timbers from damp.
New pressure-treated timber battens are fixed over the membrane at the correct spacing for your chosen tile or slate. The gauge of the battens determines the amount of tile or slate that is exposed on each course, so accuracy here is essential for a neat, weathertight finish.
Stage Six: Laying the New Roof Covering
We lay the new tiles or slates from the eaves upward, course by course. Each tile or slate is checked and fixed securely. We pay particular attention to areas that are most vulnerable to water and wind: valleys, verges, hips, and abutments.
Lead Work
Lead flashing around chimneys, wall abutments, and soil vent pipes is dressed and fitted by hand. We use code 4 or code 5 lead depending on the application. Lead work is one of the most skilled aspects of any re-roof, and getting it right is essential for long-term waterproofing. According to the Lead Sheet Association, correctly installed lead flashing should last over 60 years.
Ridges and Hips
Ridge tiles and hip tiles go on last. We use either a traditional mortar bed or a modern dry fix system, depending on the property and your preference. Dry ridge systems are mechanically fixed and do not rely on mortar, which means they are maintenance-free and resist wind uplift better than mortar-bedded ridges.
Stage Seven: What About the Roofline?
With the old roof stripped and the scaffolding in place, this is the best time to address your fascias, soffits, and guttering if they need attention. Replacing the roofline at the same time as the roof avoids the cost of hiring scaffolding again later. Many homeowners in Cheltenham choose to have this done as part of the same project for a complete, long-lasting finish.
We always check the condition of the roofline during the survey. If anything needs replacing, it appears as a separate line item in the quote so you can decide whether to include it.
Stage Eight: Final Inspection and Clean-Up
Once the new roof is complete, we carry out a thorough inspection. We check every tile, every piece of lead work, and every ridge for correct fitting and weathertightness. Nothing is signed off until we are fully satisfied with the quality.
We then remove all scaffolding, clear the site, and take away all waste. Your property is left clean and tidy. We take pride in leaving every job site looking better than we found it.
Your Guarantee and Protection
Every complete re-roof we carry out comes with a 20-year guarantee on workmanship and materials. We hold full public liability insurance up to £1 million. Visit our re-roofing services page for full details.
Now You Know What Happens During a Full Roof Replacement
The process is straightforward when you work with an experienced team. From the initial drone survey through to the final inspection, every stage is planned and explained before it happens. There are no surprises and no hidden costs.
If you are considering a re-roof in Cheltenham or Gloucestershire and want to know exactly what happens during a full roof replacement on your property, get in touch. Call us on 01242 361 626 or get in touch through our contact form today.
Related Articles
- How Long Does a Roof Replacement Take?
- How Much Does a Roof Replacement Cost in Cheltenham?
- How to Know When It’s Time for a New Roof
Cotswold Roofing & Guttering offers a full range of roofing services across Cheltenham and Gloucestershire. A drone survey is often the first step in planning a replacement. Learn more about the benefits of drone roof surveys. See our customer reviews.
For a broader overview of this topic, read our complete guide to roof repairs in Cheltenham.